Hosting your own services for (nearly) free
Bring back your devices into your own control

Meta and Google continue to build their fortunes on advertising‑driven business models that rely heavily on extensive data collection and, arguably, user exploitation. As people increasingly rely on proprietary platforms like Facebook, Instagram, and Google Photos, growing concerns arise over how their personal information is managed and protected.
Both companies have built ecosystems in which virtually every interaction, whether posting a status update, scrolling through a feed, or searching for information, generates valuable data points. In a landmark case, Meta was hit with a €1.2 billion fine after it was found to have transferred the personal data of European citizens to the United States, a jurisdiction whose consumer‑data‑protection framework does not meet the stringent standards set by the EU’s General Data Protection Regulation (GDPR).
In a landscape where data centralisation by large corporations often feels unavoidable, niche communities like r/selfhosted have reclaimed ownership of their information, demonstrating that individuals can run their own local services securely and safely.
Immich (Google/iCloud Photos)

Immich has been making waves in the self-hosted community as a drop-in replacement for Google Photos - with your data stored on your own server outside the control of Big Tech. You can run Immich on a server at home, or on a rented server in the cloud, and it functions with (nearly) all of the bells and whistles of regular Google Photos. An online demo is available here to showcase the experience of running it on a real server.
Bitwarden (Google/Apple Passwords)
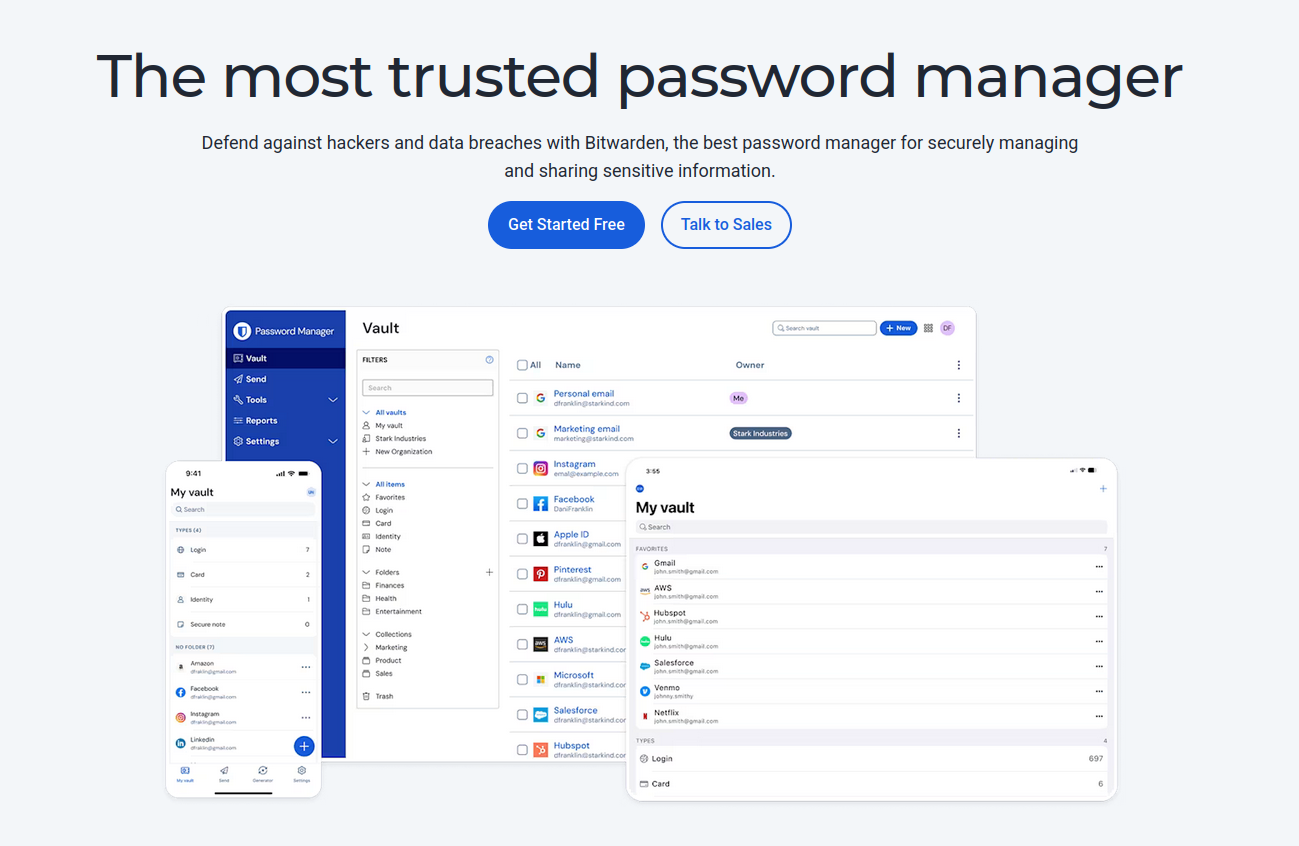
Bitwarden is one of those rare utilities where you don't realise how much you needed it until after you start using it. Before I used a password manager, I would have only a couple of password variations that I would rotate through for each new service - which lead to quite a few unauthorised login attempts!
By self-hosting Bitwarden, all of your passwords are securely stored using end-to-end encryption, and can be automatically filled out on any website you go to. As a result - you can randomly generate super secure passwords (think like jM9p%jbiHFBJLsu$), and you never have to manually type them out yourself!
Bitwarden is one of the easiest applications to self-host - once you have a server setup and running, you can install it in simply a few minutes. Plus, it takes only a minute to import all of your passwords from Google/Apple. If you're looking to self-host it, check out the Vaultwarden version, rewritten to focus on security, speed and simplicity.
AdGuard Home
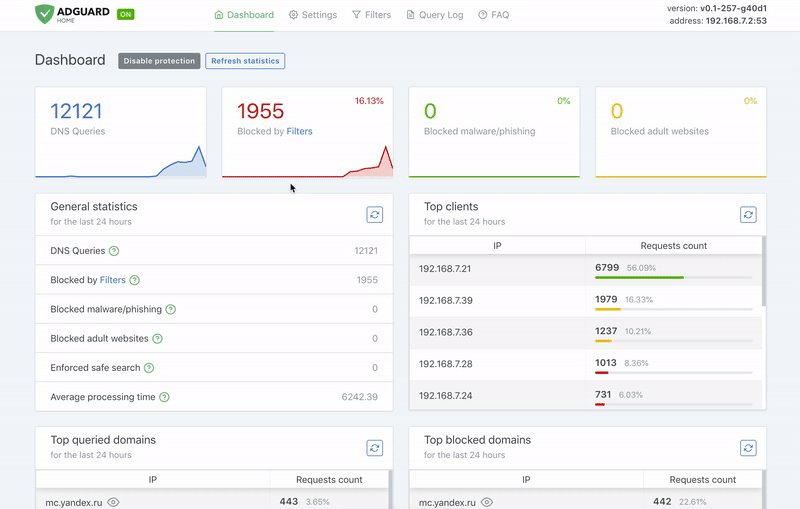
AdGuard Home blocks advertisements and tracking across your entire network! Once you set it up, it'll re-route any malicious, advertisement or tracking domains to a "black hole", stopping the network requests from ever getting through.
Much like the other services, AdGuard Home is one of the least complex apps to install on your server. Once it's installed, you configure your router's DNS servers to point to AdGuard and your devices will automatically start blocking ads.
Getting Started
It's possible to get started for under $5 or €4 a month - by renting a private server online! On their cheapest plan, Hetzner offer 2 CPUs, 4 GB RAM and a 40 GB SSD - which is a great starting point for playing around with and testing with a Linux server. If you click here, you'll net a free €20 worth of cloud credits (affiliate) - allowing you to run a server for months at zero cost! Of course - if you have an old computer laying around, you can turn it into a server by installing a server operating system such as Ubuntu Server - which will allow you to host your own applications at no extra cost.
After you have a server operating system installed, you will want to:
- Update all packages on the system.
- On Ubuntu/Debian, run
sudo apt update && sudo apt upgrade
- On Ubuntu/Debian, run
- Install Docker Engine
- This will easily allow you to install and setup new applications in just a few minutes with very minimal configuration.
- If you have no experience with Docker, I highly recommend the following two videos by NetworkChuck:
- Purchase a domain
- Purchasing a domain will allow you to access your services at a human-readable address like
example.comrather than an IP address like74.125.200.102.
- Purchasing a domain will allow you to access your services at a human-readable address like
- Setup a reverse proxy via Docker
- This will route the traffic from your websites directly to your applications.
For example: photos.example.com->Immichvault.example.com->Bitwarden/Vaultwardenadguard.example.com->Adguard Home- For beginners, I would recommend nginx-proxy-manager as it provides a simple graphical user interface. To setup once Docker is installed:
- This will route the traffic from your websites directly to your applications.
mkdir -p ~/docker/nginx-proxy-manager
cd ~/docker/nginx-proxy-manager
Create the file docker-compose.yml using a text editor like nano or vim and paste in the following:
services:
  app:
    image: 'docker.io/jc21/nginx-proxy-manager:latest'
    container_name: nginx-proxy-manager
    restart: unless-stopped
    ports:
      - '80:80'
      - '81:81'
      - '443:443'
    volumes:
      - ./data:/data
      - ./letsencrypt:/etc/letsencrypt
From there, you can bring up your stack by running docker-compose up -d. Then login to the admin UI by navigating to port 81 of the machine for the admin interface. You can find your local IP address by running ip a. If the IP of the server is 192.168.0.15, then you would type 192.168.0.15:81 into a web browser on the same network. Afterwards, you can login with admin@example.com and changeme to begin configuration.
From here, you can begin to setup SSL certificates for any domains and subdomains you might add to point to your applications. Most applications should have a page on setting up with Docker Compose, so I'd seek them out!
Once a new application is deployed in a separate folder (e.g: you might have /docker/nginx-proxy-manager, /docker/vaultwarden, ~/docker/immich), you can point your domain/subdomain by specifying the Forward Hostname / IP to the container name of the destination, provided they're on the same Docker network.